Usage
This usage guide outlines the process of using Ycopy to move data from one
drive (or folder) to another.
1) Configure the hardware
You only need to do this if you want to copy to a destination drive which is not
already an installed part of the system. Exactly what you need to do to
accomplish this may vary dependent on the specific hardware being used.
Configure the original source and destination hard disks so they are detected
and usable by windows. Partition and format the destination drive if necessary.
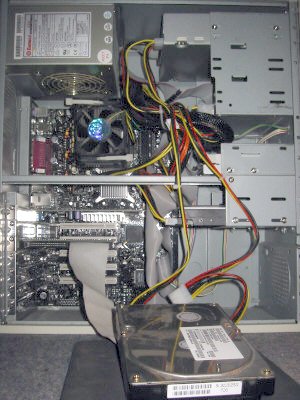
Figure 1 shows a typical configuration.
Figure 1. Source drive in foreground, copying to destination drive mounted in
the computer. Note the use of an add-on PCI IDE card. We found this can make
the process easier by simplifying master/slave configuration.
2) Copy the data
Start Ycopy, you will be presented with the main window, see Figure 2. Select
the source drive (or folder) using the upper 'Browse...' button. Select the
destination drive (or folder) using the lower 'Browse...' button. You can also
make a new folder, using the 'New folder' button in the browse dialog if
required*. Click the 'Start Copy' button to start copying the data. As the copy
progresses you will see the Status: field display the current file being copied and
Statistics: bar being updated with the amount of data copied successfully so far.
The report window will list any files that can't be copied. Note that Ycopy should
be started by a user account that has administrative privileges.
* The new folder button is not available under Windows 98
Figure 2. Ycopy main window with copy in progress. Note the buttons can be
accessed via shortcut keys e.g. Alt + B to browse for the source folder.
3) Wait until the copy completes
When the copy completes, Ycopy will let you know in the Status: bar and the
"Busy" bar will stop moving from side to side. The report window will also
become editable. At this point you may choose to add to or edit the text of the
report. i.e. you might add the customers name to the report for easy reference.
4) Optional - Print the report
As the heading says, this step is optional. It is useful when you want to be able
to report back to the customer which files were unable to be copied to the new
disk. A typical example would be in a computer shop where you could print out
the report and attach it to the customers machine.
Use the "Print" buttton to print directly from Ycopy, the "Notepad" button to
open the report in notepad and the "Save" button to save a copy of the report to
a file.
Copyright ⌐ 2003-2006. All rights reserved. Ruahine.com Software.
License and usage terms.